
Introduction
Grab Your Free Project! At the end of the article, you’ll find a link to a free project file so you can explore how this awesome effect works hands-on.
Now, imagine this: you throw a smoke grenade in Counter-Strike 2, and instead of the usual flat particles, you see a real, volumetric smoke cloud. It wraps around obstacles, reacts to light, and even changes from bullets and explosions!
CS2 revolutionizes smoke effects using modern graphics technologies. It employs Flood Fill to fill space, Raymarching for rendering volumetric smoke, and Render Target, allowing bullets and grenades to interact with it in real time.
Counter-Strike 2 Volumetric Smoke – #UnrealEngine5
A new demonstration of the realism style of smoke. Look for the stylized version in another post.
💥 What makes it special? 💥
✅ Volumetric effect – ultra-realistic smoke! ☁️
✅ Flood Fill algorithm – perfect space filling… pic.twitter.com/VQzBB29Z5m— More VFX Academy (@morevfxacademy) February 17, 2025
Want to learn how this works? Let’s dive in!
The Principle of Raymarching in Smoke Rendering
What is Raymarching
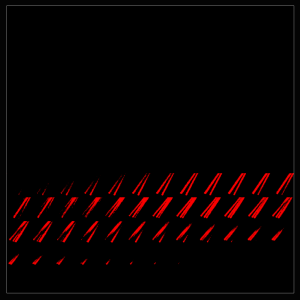
Raymarching (ray marching) is a computational graphics method where, for each screen pixel, a step-by-step progression (“march”) is performed along a ray from the camera into the scene. At each step, samples are taken from volumetric data (e.g., smoke density), gradually accumulating color and transparency until the ray exits the volume or reaches full light attenuation. In other words, unlike classic ray tracing, where a ray stops upon hitting a surface, raymarching “pushes through” the entire volume, integrating the contribution of each small particle in the medium.
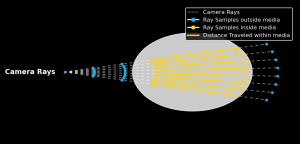
This approach is ideal for rendering smoke, clouds, or fog – effects where there’s no distinct surface, and transparency and color vary within the volume.
Why Raymarching Suits Smoke
Smoke is a heterogeneous medium that absorbs and scatters light. Ray marching allows for numerical integration of the medium’s impact on light: how much light is absorbed or scattered along the path to the viewer. This yields a realistic result – soft cloud edges, smooth transitions from transparent to dense areas, and volumetric lighting effects. The method is particularly effective when calculating how much light is blocked by a non-uniform smoke volume, using only density data at several points.
Unlike precise ray tracing, Raymarching doesn’t require finding exact intersection points with geometry – it samples approximately, making it fast enough for real-time use.
You can find more information on implementing volumetric smoke using Raymarching on the YouTube channel of Enrique Ventura:
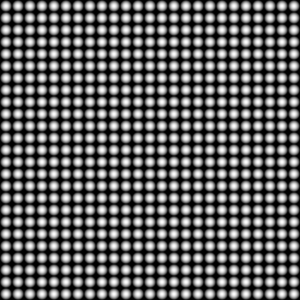
The Flood Fill Algorithm in Creating Smoke
How Flood Fill Works for Smoke
The algorithm starts at the cell where the smoke grenade explodes (the smoke source). This initial cell is given maximum smoke density and added to a processing queue. Next, the algorithm iteratively takes cells from the queue and “floods” (fills) their unfilled neighbors with smoke, provided that:
- the neighboring cell is within the allowed volume (e.g., not behind a wall),
- the total number of smoke-filled cells hasn’t exceeded a threshold
How Voxels fill environment with Flood Fill Algorithm in our CS2 like volumetric smoke in Unreal Engine 5#VFX #GameDev #UnrealEngine #MoreVFXAcademy #realtimevfx #UE5 pic.twitter.com/6GIgm7otSy
— More VFX Academy (@morevfxacademy) March 4, 2025
Each newly filled smoke cell is added to the queue. The algorithm continues until the smoke “runs out” (i.e., the required number of voxels is filled) or all possible cells within the radius are filled. The result is a set of voxel coordinates containing smoke.
Forming the Smoke Volume
To define the shape of the smoke, the Flood Fill algorithm (space flooding) is used. Smoke spreads across a voxel grid, filling accessible areas. The filling stops when the volume is exhausted or the smoke reaches an obstacle, such as walls or large objects.
In Unreal Engine, the algorithm is implemented with recursive traversal of the voxel grid. Here’s the code used to fill the space with smoke:
void ASmokeGrenade::FloodFillSphere(const FVector& Start, int x, int y, int z, float ThresholdRadius)
{
    floodCount += 1; // Counter of function calls to control the number of processed cells

    // Check for exceeding grid boundaries
    if (x < 0 || x >= xMax || y < 0 || y >= yMax || z < 0 || z >= zMax)
        return;

    // Get the voxel index in the grid
    int tempIndex = GetIndex(x, y, z, yMax, zMax);

    // If this cell is already filled, exit
    if (Grid[tempIndex] == true)
        return;

    // Get the world position of the current voxel
    FVector CurrentPosition = ConvertGridLocationToWorldLocation(Start, x, y, z);

    // Calculate the distance from the smoke center to the current voxel (without expensive square root operations)
    float Distance = (CurrentPosition - GetActorLocation()).FVector::SquaredLength();

    // Check if the current cell exceeds the allowed smoke radius
    if (Distance > (pow(ThresholdRadius, 2)))
        return;

    // Check for obstacles (e.g., walls or large objects) at this point
    bool bIsBlocked = GetWorld()->OverlapAnyTestByChannel(
        CurrentPosition,
        FQuat::Identity,
        ECollisionChannel::ECC_WorldStatic,
        FCollisionShape::MakeSphere(50 * VoxelSize)
    );

    // If there’s an obstacle, do not fill this cell with smoke
    if (bIsBlocked)
        return;

    // Mark this cell as filled
    Grid[tempIndex] = true;

    // Add it to the list of filled positions
    GridPosition.Add(CurrentPosition);

    // Recursively spread the smoke in six directions (all adjacent voxels)
    FloodFillSphere(Start, x + 1, y, z, ThresholdRadius);
    FloodFillSphere(Start, x - 1, y, z, ThresholdRadius);
    FloodFillSphere(Start, x, y + 1, z, ThresholdRadius);
    FloodFillSphere(Start, x, y - 1, z, ThresholdRadius);
    FloodFillSphere(Start, x, y, z + 1, ThresholdRadius);
    FloodFillSphere(Start, x, y, z - 1, ThresholdRadius);
}
How This Implementation Works
- The function receives voxel coordinates and checks if they exceed the grid boundaries.
- It checks if this cell is already filled – if so, the function exits.
- It calculates the distance from the grenade center to the current voxel. If it exceeds the specified ThresholdRadius, the cell isn’t filled.
- It checks for obstacles. If there’s an object blocking the smoke in the current cell, that area isn’t filled.
- The cell is marked as filled and added to the list of filled positions.
- The function recursively calls itself for all six adjacent cells, filling the surrounding space.
Thus, smoke spreads in all directions but doesn’t pass through walls and is limited by the ThresholdRadius radius.
Using Render Target for Smoke Interaction
Smoke Interactivity
To implement smoke interaction with shots and explosions, a Render Target is used – a texture where data about real-time impacts on the smoke are recorded. This system allows dynamic changes to the smoke volume based on environmental interactions, enabling effects like bullet punctures, explosion dispersion, and gradual smoke restoration. 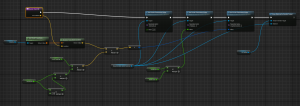
Recording Information in Render Target
The core implementation relies on converting the hit position into global UV coordinates, which are used in the material to record changes in the Render Target. Each shot or explosion records data about its interaction with the smoke, specifying:
- UV position – the coordinates where the change is applied.
- Influence radius – determines how large an area will be affected.
- Influence density – used to control the effect (reduction or restoration of smoke).
Registering Bullet Hits
When a bullet passes through the smoke, the system identifies all hit points in the voxels and records them in the Render Target. For each hit:
- The position is calculated in world coordinates.
- It’s converted into global UV coordinates.
- In the material working with the Render Target, this point is recorded with a small radius, creating a local puncture effect in the smoke. Since the bullet travels through the entire smoke volume, it records multiple points in the Render Target along its trajectory, creating a visually accurate cloud rupture effect.
Registering Grenade Explosions
For grenades, a similar principle is used but with different parameters:
- The explosion center is determined.
- It’s converted into global UV coordinates.
- A single point is recorded in the Render Target, but with a large radius, creating a powerful smoke displacement effect. Unlike bullets, which record many small points, grenades affect a large area simultaneously, dispersing smoke at the explosion site.
Material for Recording Changes in Render Target
The material used for working with the Render Target accepts three main parameters:
- UV coordinates of the impact.
- Radius of change.
- Influence density. This allows for different effects depending on the type of interaction. For example:
- A bullet records many small points along its trajectory.
- A grenade records a single large area.

Smoke Restoration
To prevent smoke from remaining permanently altered, it gradually restores over time. This is implemented using a second Render Target, which incrementally adds smoke density to areas where it was reduced. The process works as follows:
- The restoration Render Target records a gradual increase in density.
- The smoke material reads both textures (the main and restoration ones) and restores the smoke in depleted areas. As a result, bullet holes disappear after a short time, while smoke after an explosion returns more slowly.
Implementing a Stylized Version of Smoke
Creating stylized smoke requires only minor changes to the shader used for the realistic version. In fact, creating your own stylized effects is quite simple, and you can easily adapt this system to any visual style.
Counter-Strike 2 Volumetric Smoke – Now in a Stylized Version!
🚀 The More VFX Academy team has taken volumetric smoke to the next level – now in a stylized version!
🔥 What’s inside?
✅ Volumetric effect – Soft, artistic look for stylized games
✅ Flood Fill algorithm –… pic.twitter.com/Fe2lK72VM9— More VFX Academy (@morevfxacademy) February 17, 2025
Differences Between Stylized and Realistic Smoke
The core principle remains the same: the same shader used for realistic smoke is applied, but with a few key changes:
- Rounded Transparency In the stylized version, we eliminate the smooth transparency gradient. All transparency values are rounded to 1, meaning the smoke now appears as sharp shapes without smooth dispersion.
- Sharp Color Transitions For color representation, we use a color map (Color Ramp), but without interpolation between colors. This means the smoke color shifts abruptly from one shade to another, without smooth gradients.
![]()
- Use of Patterns in Textures To add stylization, the shader includes support for patterns and texture masks. This enables the creation of unique stylized smoke variations, which can look, for example, like comic book or cartoon styles.
Comic Book-Style Visuals
Counter-Strike 2 Like Stylized Smoke – Experimenting with Patterns!
What we’ve shown is just a small part of what’s possible! Using different patterns and techniques, the look of the smoke can be completely transformed, offering endless creative variations.
You’ll soon be able… pic.twitter.com/Vitr92IvUQ— More VFX Academy (@morevfxacademy) March 4, 2025
This approach allows for easy modification of the smoke’s visual style, for example, making it resemble effects from a game like Hi-Fi Rush or other comic book styles. Thanks to sharp color transitions and the ability to add unique patterns, the smoke takes on a distinctly artistic appearance.
Conclusion and Project Files
Now it’s time to put it into practice! We’ve prepared a free project file for you, which you can download using this link:
Now you can explore how this effect was implemented, delve into all the details, and even create your own variation!
Volumetric smoke in Counter-Strike 2 is a striking example of how modern graphics technologies not only enhance visual quality but also add new gameplay opportunities. The combination of Raymarching for rendering, Flood Fill for shaping the volume, and Render Target for interactivity creates dynamic and realistic smoke that responds to its environment. These technologies open new horizons for developers, allowing them to easily adapt the effect’s style for any game.
If you’re passionate about the world of visual effects, want to learn how to create stunning effects like these, and work in game development, we invite you to join More VFX Academy! On our courses, you’ll learn to create effects for games from scratch and work with the latest technologies in this field.
Join us and become a VFX legend! 🚀